Sew Frustrating

Sorry, it asked for a title and…

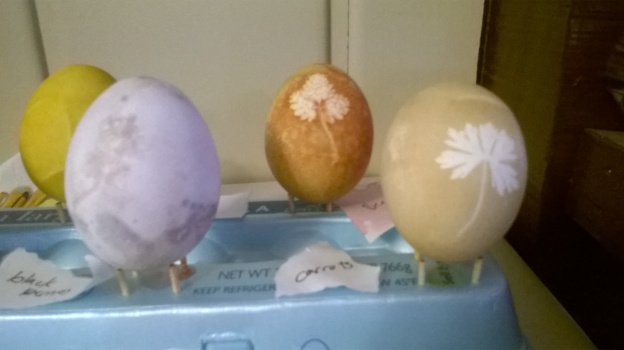
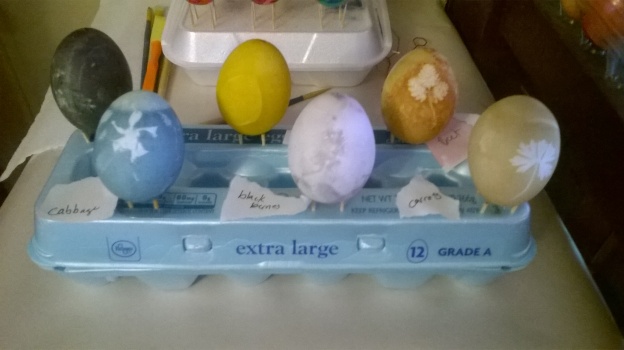
Anyway, today is a blog kind of day. I still owe you an entry into the Easter egg chronicles, pretty much the only thing I do on this blog anymore is a yearly Easter egg entry, and you’ll get one. But today I’m writing about something else. I call myself a crafty sewer. I wince when people say something along the lines of “Oh, you sew…” Because technically I suppose I do, but I’ve always struggled with it. You know, you actually should pin things, and you really do need to iron.

Hang on.

If you’re reading this in a timely manner after it is written, you know what is going on in the world. If you’re coming to it from any point in the future, you may not have checked the date, so allow me to provide a brief context: Worldwide pandemic; people arguing over what’s more important, the economy or the at risk; confusing talk of a curve and a populace that seems to misconstrue the shut down as an attempt to eradicate a disease (it isn’t, it’s to slow the contagion to a manageable rate the healthcare industry can service without being overwhelmed); and the looming experiments in reopening the public places.

My husband has an essential job. Perhaps because the public is going to start moving, or perhaps because they are simply slow to adjust, they started requiring face-masks this week. (They did reduce staff and space out the desks, so I suspect added measures for potentially increased public risk. Benefit of the doubt.) So, he needed masks.

Now, I’d put off making masks with my daughter, who is learning how to sew from someone who can actually do it properly, because I haven’t even turned on the sewing machine in almost five years. But, this was a requirement, so I dove it. After all, it really is something I can do. It might not be as pretty as some others, but they’ll be better than the no-sew folded napkins with rubber bands he’d be stuck using if I didn’t.

img_0552

It got me. I had forgotten how good it felt to make something. And the third one really did approach something I’m not embarrassed by. (I used this woman’s wonderful pattern.)

Then my husband handed me a pair of beat up old jeans and asked me to make a mask out of the denim. It’s half a joke, he knows it would be difficult to breathe, but for the cool factor…So I will, but first, I had to try out an idea I saw on pinterest a long time ago. The pin doesn’t go anywhere, it’s just a picture, but it was one I could figure out!

img_0556

A child’s apron! This isn’t really a be a tutorial post, but here’s how I did it:

  1. Cut leg up the outer seam as high up to the waist as possible, right under the pocket in the front, and use a seam ripper to remove the belt loops.
  2. Cut leg in half at the giant hole in the knee and open the lower half at the inseam, removing the outer seam.
  3. Fold the top in half at the pocket, pinning in place, using the pocket at a guide.
  4. This is the confusing to the explain bit. If you label the panels from the left a, b (the bit with the pocket), and c, and lay it out so that panel b is folded in half and pinned in place with the fold on the left, most of what was the front of the leg, a, is now upside down, but there was enough difference between the back and front that I pinned the lower half of the inseam to the right edge of panel b, lining it up with the uncut inseam (this is why pinning it in half was so important).
  5. Use a ruler and mark everything squared up and even and cut.
  6. Sew the inseam onto panel b.
  7. Take a second fabric (I used an old pair of girls corduroys) and cut two inch strips.
  8. Fold and iron the strips in half, then fold and iron the edges into to the first crease so you have something resembling double fold bias tape (I didn’t care about the bias but I don’t know enough about sewing to know if there’s a term for what I just made…).
  9. Sandwich the edge of the denim with the tape and pin it all the way around.
  10. Sew the tape to the denim. I used a fancy wide stitch to both be cute and hold better.
  11. Make two more pieces of “tape” but fold in thirds instead of quarters.
  12. Sew down the length of the tape.
  13. Sew one end of each piece to the top of the apron with an X, and single fold hem the other end of each piece with another X.
  14. Realize that the apron sides are wide enough to overlap behind your child and nix the ties you were going to make and install a snap in the top corners instead.

Here’s where the title of the post comes in, and why I insist I’m a crafty sewer and nothing more.

img_0557

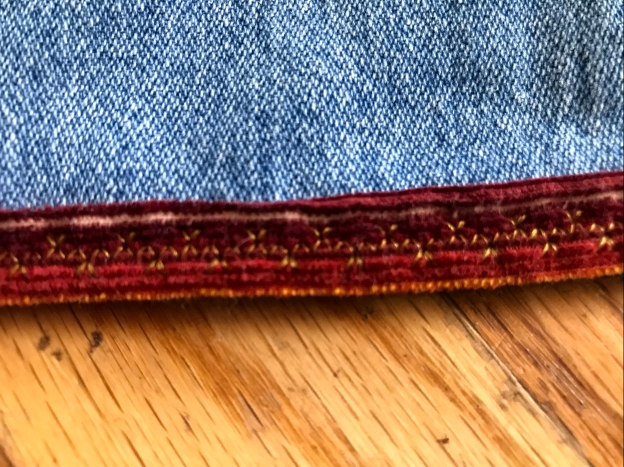
It started out great along the bottom edge.

img_0563

I broke my needle here, where two strips of tape over-lapped. So, I resolved to not fold the top layer over for a finished edge, which was terribly ambitious to begin with.

img_0559

Things kept going wonky, and it took me forever to figure out that I had put the wrong needle in when I replaced my broken one.

img_0562

This is the most noticeably bad section.

img_0561

But I got it worked out in the end.

All in all, I still love making things, and sewing is fun, even with the frustration. However, I don’t think I’m ever going to amount to much more than a crafty sewer. I hate sewing curves, though I imagine I’ll get better. I tried interfacing once, and it won. Still plan on giving quilting a try.

Maybe that’s what I’ll get out of this pandemic, the motivation/inspiration to actually get the machine out and quilt. After all, where’s the sense of triumph in tasks that don’t challenge?

Easter Eggs – Year 3 Week 4 – Borax Crystals

I told you I’d write the final eggs of last year before writing up this years…

I’m a hot mess. You are fine. Want to comiserate? Read the next paragraph. Just want the eggs? Skip down to EGGS.

Specifically, in case you’re wondering, I have adult diagnosed ADHD for which I have been able to engage in zero professional counseling for. All self-taught and self-trained self-modulation here! Can’t say I actually wish we could afford the medication for me, because I mostly like my brain, but a therapist checking up on me and giving guidance would be nice… especially since my 5th grade daughter has finally started actually struggling with it (instead of just enjoying the not insignificant benefits). ANYWHO I also have that wonderful neurological disorder known as migraines which actually, and this is so very comforting to learn, actually causes brain damage! Yep, that’s a thing. The pain isn’t bad enough, it has to actually have lasting effects. Yippee.

NOT GRIPING

Just, you know, explaining why more than four posts a year on anything resembling a reasonable time table is a challenge, and to make you feel better about your own (I’m assuming, no offense) mess of a life. At least to let you know you aren’t alone in feeling constantly behind and overwhelmed.

The EGGS!

For our final “not really an egg” Easter eggs, we attempted to make borax crystal eggs. I looked at a few tutorials online to figure out our best chances. I think I found this link to be the most useful.

2017-4-14 easter eggs week 4 - borax crystals

We used plastic eggs and twisted wire through the holes in the top to suspend in the borax solution. Then we wrapped the eggs in pipe cleaners. I wrapped mine as tightly as I thought I could, while my daughter left significant space in a loose coil. The eggs inside the box were painted with glue and coated with borax. The eggs shells were an attempt to make egg shell geodes like this experiment.

2017-4-15 easter eggs week 4 - borax crystals progress

So, instead of following a prescribed ratio, I just dissolved as much borax into Pyrex glasses full of colored water as I could, and we submerged three of our four eggs, too much of the glued on borax had already flaked off the last, but we decided to proceed with the other for science. I carefully poured some of the solution into the empty egg shells, and then we carefully encouraged as much air to escape the top of each egg as possible so they would sink into the solution.

2017-4-23 easter eggs week 4 - borax crystals results (1)

I forgot to cover or insulated the glasses, and crystal growth was not encouraging, so I reheated the purple solution, redissolving the borax, a couple of times, actually, and let them sit over a couple days rather than hours.

2017-4-23 easter eggs week 4 - borax crystals results (2)

2017-4-23 easter eggs week 4 - borax crystals results (3)

You can see how her egg, with only one “round” in the borax and the widely spaced pipe cleaners was underwhelming. We were happy with mine, however, and she enjoyed the science so much she wasn’t even much disappointed. These were really both “ours” in a way the other crafts were not as this was an actually experiment.

2017-4-23 easter eggs week 4 - borax crystals results (4)2017-4-23 easter eggs week 4 - borax crystals results (5)

2017-4-23 easter eggs week 4 - borax crystals results (6)

I was happy enough with the way the shell geodes turned out. I think they’re very pretty, but they ARE very delicate.

There you have it, our borax crystal eggs. I had planned to attempt alum crystals as well to compare, but I forgot where I put the alum and didn’t find it until June, so maybe when the boy is old enough for this one we’ll do that instead.

Spring Awakening Once More

And once again I have blogged nothing all year. At least I completed 3 out of 4 Easter Egg posts last year. I’ll write up the fourth before we start this years eggventure.

Girl Scouts continues to move forward with merely adequate activity. The summer was too busy and sleep deprived for us to complete an independent journey, but we did switch to a troop closer to home with other juniors to keep her company. There have been a handful of badges, but a journey weekend has been postponed at least 3 times and I’m now uncertain the bronze award will happen. I have my doubts the summit award will happen, but we’ll still try this spring/summer. She’s informed me she cares more about that than collecting badges. Either way, she’s had piano, cross country running, school choir, and now 5th grade band keeping her busy.

We’ve also moved into counseling for ADHD, so self motivation and the pursuit of personal interests is a life lesson we’re learning, rather than relying on mom to remember everything she wants to do and find a time for it, she needs to check in and remind me she’d like something to happen. Tough lesson to learn when you live at 90mph. The point is that any disappointment is not the sole responsibility of a troop, parent, or child. It’s life, it’s always complicated.

Easter Eggs – Year 3 Week 3 – Napkin Decopage

This week we took advantage of a little brother free evening and worked on eggs Friday night instead of waiting until Sunday.

Tonight, we used napkins and tissue paper to decoupage eggs. I saw no reason to worry with the blowing of and maintaining fragile eggs shells, so we used white plastic eggs.

decoupage eggs 1

You can kind of see our first eggs drying while she works. Hers is at the top, a bit capsule shaped.

She just jumped right in without thinking ahead too much or about the shape of the egg. For her next egg, I drew her attention to what I was doing and we talked a little about planning and details.

Now, there are a few people in my life who always seem to think I’m a far more accomplished crafter than I truly am. Most of the time I’m making it up as I go, barely managing to find a way to make stuff work with the usually inadequate materials I have on hand. I’ve never actually done decoupage before, much less on a curved surface, so this was an adventure for me as well.

By her third egg, she’d kind of gotten the hang of it. She decided that since her first two eggs were napkins designs on matching tissue paper, she’d make her third one all mismatched. She used bits and pieces, and she even figured out that smaller pieces lay flat to the egg more easily.

We used Modge Podge and foam paint brushes: glue on the eggs, paper on the glue, glue on top. Then we let it dry 20 min and for the top coat we decided to do them half an egg at time so they wouldn’t dry to the soda caps we were using as stands. Paint the top half of the egg, wait 20 min, paint the bottom half of the egg, wait 20 min and repeat. Two coats each end.

decoupage eggs 2

Her third, first, second, my first, second, and third.

Yes, I used the caps off 20 oz soda bottles for egg stands. It was the lowest amount of contact I could manage.


My second egg is my Arendelle egg, made from a Frozen napkin my daughter didn’t think was Eastery until I started cutting it to pieces. My third is my favorite, I think, but if her second had been as smooth as her third I think it might have been.

Easter Eggs – Year 3 Week 2 – Sequins on Styrofoam

This week’s eggs were sequin covered Styrofoam. I opted for the smooth Styrofoam, assuming the pins would stay put better in a more solid foundation.

sequin egg making

As usual, Quen the cat presided over the proceedings.

sequin egg making 2

It didn’t take long for her to mention the pins were hurting her thumb.

Instead of our usual three each, she only made one, and I only made two to test a theory. Working with my usual philosophy of working with what we have first, thereby spending as little as possible, I bought the eggs, figuring we’d make due with the sequins and pins we had on hand.

I started with a light green at the top of the egg, planning to create and ombre effect, blending it with a darker green around the middle, and all dark green at the bottom, adding a few flowers and a butterfly to the middle somewhere. However, it didn’t take long to figure out that if I did that, I would use literally all the green sequins, leaving my daughter none should she want some, and still quite possibly run out short of covering the eggs, so…I decided to add more flowers to the middle. It ended up quite a bit busier than I would have liked, but it was difficult to be too disappointed in that since the whole thing looked more tacky than like the jeweled egg I was hoping for anyway, and the pins didn’t help any.

sequin egg 3

I took them outside to photograph this time, hoping the natural lighting would help me get better color integrity, still had to edit the level. Oh well.

My daughter liked her egg well enough, but the project was far too tedious for her to properly “enjoy,” not to mention the toll taken by pushing all those small pins into the egg. She would stop every so often when she couldn’t take anymore. I think it took her four or five sessions to finish her egg (and there are still some spots the styrofoam peeks through on the side I didn’t photograph).

sequin egg 1

Her theme was the sky, composed of any blue sequin she could find.

My theory was that I wouldn’t particularly love any egg decorated this way unless I was intentionally going for a dragon egg, you know, one with scales. Since we ran out of pins before my daughter finished her egg, I decided to spring for the sequins to test this theory.

sequin egg 2

It’s an iridescent pale robin’s egg blue with small sequins at the top, medium sequins around the middle, and large sequins around the bottom.

It could have been better if I’d more intentionally overlapped the first row of each size more tightly, gradually expanding them in to the next size, but I proved my theory. I don’t like this as a bejeweled robin’s egg, I like it as a dragon’s egg.

So

Easter Eggs – Year 3 – String Wrapped Wood

We started this years eggs last week, but I had to catch up on blogging last years eggs before I could share this years.

Anyway, year one’s theme was multi-color methods, year two’s theme was dye methods and embellishments, and year three’s theme is non egg materials.

For week 1, we wrapped wooden eggs (that I inherited from my grandmother) in baker’s twine from the dollar tree.

twine eggs

My daughter had pink, purple, and blue twine. I had orange, yellow, and green twine. I had barely finished the sentence “wrap the egg in twine” before she was asking if she had to do it the same way as I was. Of course I said no, she could do it however she liked, so she made the middle one first, the bird house second, and then decided to try doing it my way with her last egg, but she still wanted to use all three colors, so that was her solution. The not exactly orange in the picture egg was my only attempt to shake things up, wrapping at a diagonal instead of strictly horizontal.

This was simple enough to execute with a modicum of patience, and the result is beautiful, particularly if you’re going for a particular look. I kept things simple primarily because I had a display method in mind:eggs year 3 display 2Hers I set up on a shelf:

eggs year 3 display

So, not exactly “fun,” but worth while for those who like the look.

Displaying Year 2 Easter Eggs

I didn’t go for another hanging display showcasing all four methods. They simply weren’t compatible enough. Vibrant colors, neutrals, shiny, delicate, they were just too diverse.

So…

eggs year 2 display 2

I put my favorites in stemmed tea light candle holders from the dollar tree.

eggs year 2 display 2.5

I was trying to get a good picture, hah, and my son decided he needed to help. Hello, bubby!

Yes, my three favorites were mine. Forgive me for admitting that I like my finished products over those of a nine year old. I love her eggs, they are very precious to me, and she gets better at crafting every year, but while I am far from perfect I am more intentional in design and careful in execution. Sometimes she surprises me, though, and I love those moments.

eggs year 2 display 3

The Paas/glitter and food dye/foil leaf I placed in a large, clear vase. We happen to have a high counter that divides our kitchen and dining room, and the sparkly eggs really draw the eye.

I didn’t add my Charlie Brown egg, it was fun to make, but is a little too noticeable, and my other egg broke. Sad.

eggs year 2 display

The Kool-Aide/Decoupage and natural dye/plant relief eggs I placed in colorful plastic shot glasses I found at Walmart for 20 cents each. There’s a little piece of plastic, the squares they used to keep the glasses from sticking to each during shipping, waded up in the bottom of each glass to support the egg.

eggs year 1 display

As a bonus, I found that my third tier eggs from year 1 fit in this tall vase.

As you can see, my daughter improved on their original design by adding stickers to hers. The pink shiny nail polish egg was on top, but I had originally set the vase on the middle shelf of the baker’s rack, thinking it would be safe. The other items on that shelf get left alone. The eggs drew my son’s attention, however, and he was able to reach right in and grab that top egg. It made a really satisfying grenade. The others would have died as well, but I was able to move the vase to the kitchen window before he was able to grab another. He was les sthan pleased…


Year 2 Easter Eggs Week 4 – Kool Aid with Botanical Illustrations

The final dye method we played with last year was Kool-Aid.

2016-3-6 easter egg experiments - cool aid and decopage

Wish I could tell you the flavors. Pretty sure that’s blue raspberry and lemon lime, the black one is probably grape? the yellow is probably lemonaide, seriously no clue what the brown one is, and the red is most like cherry

I really liked the mottled coloring, it had a very interesting effect.

The addition we made to these was decoupage. I have two versions of a flower guide coloring book from my grandmother. They both had the same color guide illustrations inside the cover. We used one set of pictures to cut out flowers for our eggs.

kool aide eggs

I can only photograph one side of the egg at a time, but my daughter added a flower to both sides of the egg. I only placed one on each. Also, the green egg on the end is a much prettier green in person, just think, that table cloth their on? Yes, that’s a spring green. This is what happens when the only camera you own is a also a phone. Pro tip guys, don’t drop you nice camera (high-mid range point and shoot, actually, nice ones are expensive for amateurs) on concrete.

It turned out well, overall, I think. Except, piece of advice, seal the Kool-Aid (is there a hyphon or not? I keep going back and forth) or other dye before adding the decoupage. I wish I had coated them all in Modge Podge and let it completely dry before adding the flowers. The dye had a tendency to run in the wet glue.

kool aid eggs mine

The iris on green is my favorite, and you can kind of see in the others where the white flowers have been tinted by the Kool Aid

kool aid eggs hers

That pink egg is red, remember the first picture in the post? the one taken last year on my real camera? I think she did a great job with her decoupage, not wrinkly or bunching her very narrow and delicate picture.

I do think decoupage on one of the smoother dyes, like food coloring or Paas, would showcase the flowers better, but thus is the nature of experimenting. I do really like the iris and green, though, that one worked particularly well, probably because it’s green…

Year 2 Easter Eggs Week 3 – Food Coloring and Foil Leaf

Ok, so this was really week 2. The natural dyes were week 3. I’m a hot mess most of the time. (Why is the mess hot? What kind of mess are we talking about? Seriously, where did we get this saying from? Personally, I got it from my manager when I worked at Michael’s 7 years ago…sorry) Anyway, like I said earlier, my son only started sleeping semi-decently a couple months ago and two months away from being 2, so counting late stage pregnancy issues, two full years of sleep deprivation on top of employment upheaval and financial stress and the resulting multi-cause exhaustion eating away at my cognitive capacity. Be grateful my children are fed, clothed, and we all make it to work/school/church relatively on time, everything else is a bonus.

Week 2, the week before the natural dyes and plant relief, we played around with food coloring and a foil leaf, gold/silver/copper.

2016-3-20 easter egg experiements - food dye and metal leaf (1)

The food coloring produced beautifully brilliant eggs and is the only method to produce as even a color distribution as Paas.

2016-3-20 easter egg experiements - food dye and metal leaf (3)

The three on the left are hers, the three on the right are mine. Don’t remember what I was going for with the grey one, but I still like the way it turned out.

To add dimension this week, we applied foil leaf to our eggs with foam paint brushes and Modge Podge.

2016-3-20 easter egg experiements - food dye and metal leaf (4)

The blue one is my intentionaly global-esque egg. My daughter “banded” her pink and orange eggs on different axis, and went for a random approach with the teal one.

This was a bit tricky and I don’t think my daughter enjoyed it at all. I was trying to save money and bought the package that had all three metals mixed together in flake form. I think she probably would have been all right with the sheets that you then rub off in places for the mottled look. The flakes didn’t like to stay where you put them. They’d either slide around in too much glue or stick to your finger or the applicator and reject the egg altogether. In the end, we persevered and figured it out with some gorgeous results, though.

P.S. If you know a better way to apply foil leaf and can point out how we made it more difficult for ourselves than necessary, please, by all means, enlighten me. Seriously, any of my posts that you can point out short cuts or improvements to, please please please make suggestions.

Year 2 Easter Eggs…They really did happen! Natural Dye and Plant Relief

So I apparently only blogged the first week of last years Easter Eggs. Must have gotten distracted by annoying life things, but the eggs themselves did happen. I promise.

Week 2 was natural dyes with a plant relief pattern. I learned a valuable lesson regarding natural dye. It requires planning ahead. I did not plan ahead. And then I think we were impatient and did not let them set more than a few hours instead of overnight. not sure exactly, it was a year ago, but I also made do with what vegetables I could find at Kroger, we didn’t have our Sprouts yet. Anyway, they turned out pretty, but not as colorful as I was hoping. This is one we’ll be returning to in a few years.

As far as the plant relief goes, some turned out beautifully, some obviously weren’t secured tightly enough, either than or the chosen weeds were more porous than others.

2016-3-13 easter egg experiments - natural dye with plant reliefs (4)

can’t remember what made the black one; the blue was cabbage, improperly aged and set; the yellow is turmeric; the stone looking one blackberries; the brown is beets; and the tan is carrots

2016-3-13 easter egg experiments - natural dye with plant reliefs (3)

the relief on the black egg didn’t show up at all; the relief on the cabbage egg was a flower with smudged and smooshed petals, looks pretty cool, but the panty hose we tied it on with was tied at the top and made the dye really thin there; the relief on the turmeric didn’t show up at all, but the color was gorgeous.

2016-3-13 easter egg experiments - natural dye with plant reliefs (2)

the relief on the blackberry died egg didn’t show up at all, and it came out with an odd stone look. it’s odd, not really bright or colorful, but beautiful in a subdued way; the beets probably needed to be prepared differently, or combined with something, but the odd color is still pretty, and it has one of the best reliefs; and the carrots weren’t colorful at all, but, again, pretty in a neutral way, with a very nice relief

2016-3-13 easter egg experiments - natural dye with plant reliefs (1)

all in all, it was a learning experience and well worth trying again with better attention to directions, hehe